|
|
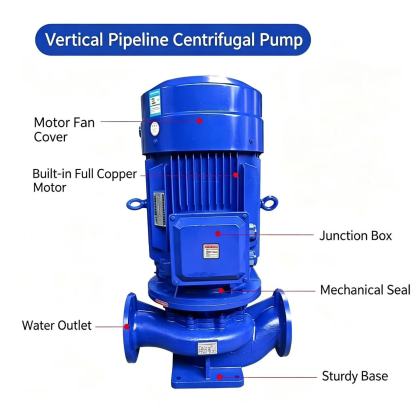
ISG Vertical Pipeline Centrifugal Pump cold start operation procedureCold start operation for an ISG vertical pipeline centrifugal pump refers to energizing the unit after it has sat idle for days, weeks, or longer, often in low-temperature conditions or with the internal flow path partially drained. Unlike routine restarts after short shutdowns, this scenario carries hidden risks such as congealed lubricant, settled sediment, trapped air pockets, and frozen residual fluid that can lead to mechanical seal failure, shaft seizure, or unexpected overload if handled improperly. A methodical cold start routine eliminates these avoidable failures and helps the pump transition smoothly into stable, long-term operation without unnecessary component wear.
Pre-start environmental and external system inspectionBefore touching any valves or electrical controls, walk the full length of the suction and discharge piping connected to the idle pump. Check for visible frost on the pump casing, cracked drain plugs, or bulged pipe sections that signal residual water may have frozen and expanded inside the flow path. If the unit has been exposed to sub-zero temperatures for multiple days, tap the outer surface of the pump casing lightly with a soft rubber mallet to listen for solid ice blockage that would lock the impeller in place. Clear all accumulated ice, snow, or standing water from the base plate, motor footing, and surrounding work area to prevent slips during operation and avoid water seepage into electrical enclosures. Confirm the suction source level is at or above the minimum required net positive suction head elevation, so the pump will not immediately draw in air the moment it begins to spin. Make sure all pressure gauges, temperature sensors, and vibration probes are connected, calibrated, and showing stable baseline readings before moving to the next step. Manual rotor check and controlled pre-warmingAfter the external system is confirmed free of obvious blockages, access the exposed coupling between the motor and pump and turn the rotor slowly through three to five full revolutions by hand. You should feel consistent, even resistance all the way around, with no stiff spots, scraping noises, or sudden jolts that signal frozen fluid, settled grit, or bearing seizure. If the rotor sticks at any point, never force it with a long cheater bar, as this can snap the shaft or shear the impeller key. Instead, apply low-temperature, forced warm air to the bearing housing, pump casing, and seal chamber for 15 to 30 minutes to soften thickened grease and melt small pockets of trapped ice. Once the rotor turns freely, check the bearing lubricant level and appearance to confirm it has not separated, hardened, or become contaminated with water after sitting unused in cold conditions. Top up or replace lubricant if it fails visual inspection, so the bearing surfaces will receive full hydrodynamic protection the moment the motor begins to turn. Priming, venting and pre-energization validationFully open the suction valve and leave the discharge valve completely closed to create a low-resistance flow path for priming. Open the high-point vent on the top of the pump casing slowly, and allow cold process fluid to fill the entire internal chamber from the suction line upward. Keep the vent open until a steady, bubble-free stream of fluid flows out without spurting or mixing with air, then tighten the vent plug securely. This step removes all large air pockets that would otherwise cause cavitation, unstable pressure, or dry-running damage to the mechanical seal the second the impeller spins. Before applying full power, perform a quick point-in-time bump test of the motor to confirm rotation direction matches the arrow marked on the pump casing. This test should last no more than one to two seconds, just long enough to verify correct phase sequence without allowing the seal to run dry for any meaningful period. If rotation is reversed, shut off power immediately and swap any two phase leads at the motor terminal block before proceeding. Gradual startup and post-run-in verificationOnce all preliminary checks are complete, start the motor and let it run with the discharge valve still closed for no more than the short duration specified in site operation guidelines. Watch the outlet pressure gauge closely to confirm it rises smoothly to the rated shut-off head, with no wild fluctuations that signal remaining trapped air or internal imbalance. Monitor motor current in this phase to ensure it stays within the safe no-load current range, rather than spiking far above the rated value. After the pump runs smoothly at shut-off condition for two to three minutes, begin opening the discharge valve in small, gradual increments over five to ten minutes. This slow load application prevents sudden water hammer, avoids shocking the cold piping system, and gives the lubricant time to reach full operating viscosity and form a consistent protective film on all bearing surfaces. Track bearing housing temperature, seal leak rate, and overall vibration level continuously as flow approaches the design operating point. After the pump runs stably at target flow for 30 minutes, perform a final walkaround to confirm no new leaks have opened at flanges, seals, or vent ports as cold components warm up and thermally expand. Log all initial pressure, current, and temperature readings in the equipment maintenance file to create a clear performance baseline for all future cold start events. |